How to create a cost group
Cost groups are how CloudMonitor maps spend onto your business. Almost everything else (budgets, chargeback, team reporting, who can see what) hangs off them, so this is the first thing to set up and the thing worth getting right.
Before you start
Section titled “Before you start”Decide what a group represents before you create any. The common choices are by team, by product, or by environment, and mixing them produces a hierarchy nobody can reason about.
A useful test: could you name one person accountable for this group’s spend? If not, it’s probably the wrong boundary.
Step 1: Open the form
Section titled “Step 1: Open the form”Cost Allocation ▸ Cost groups ▸ New cost group.
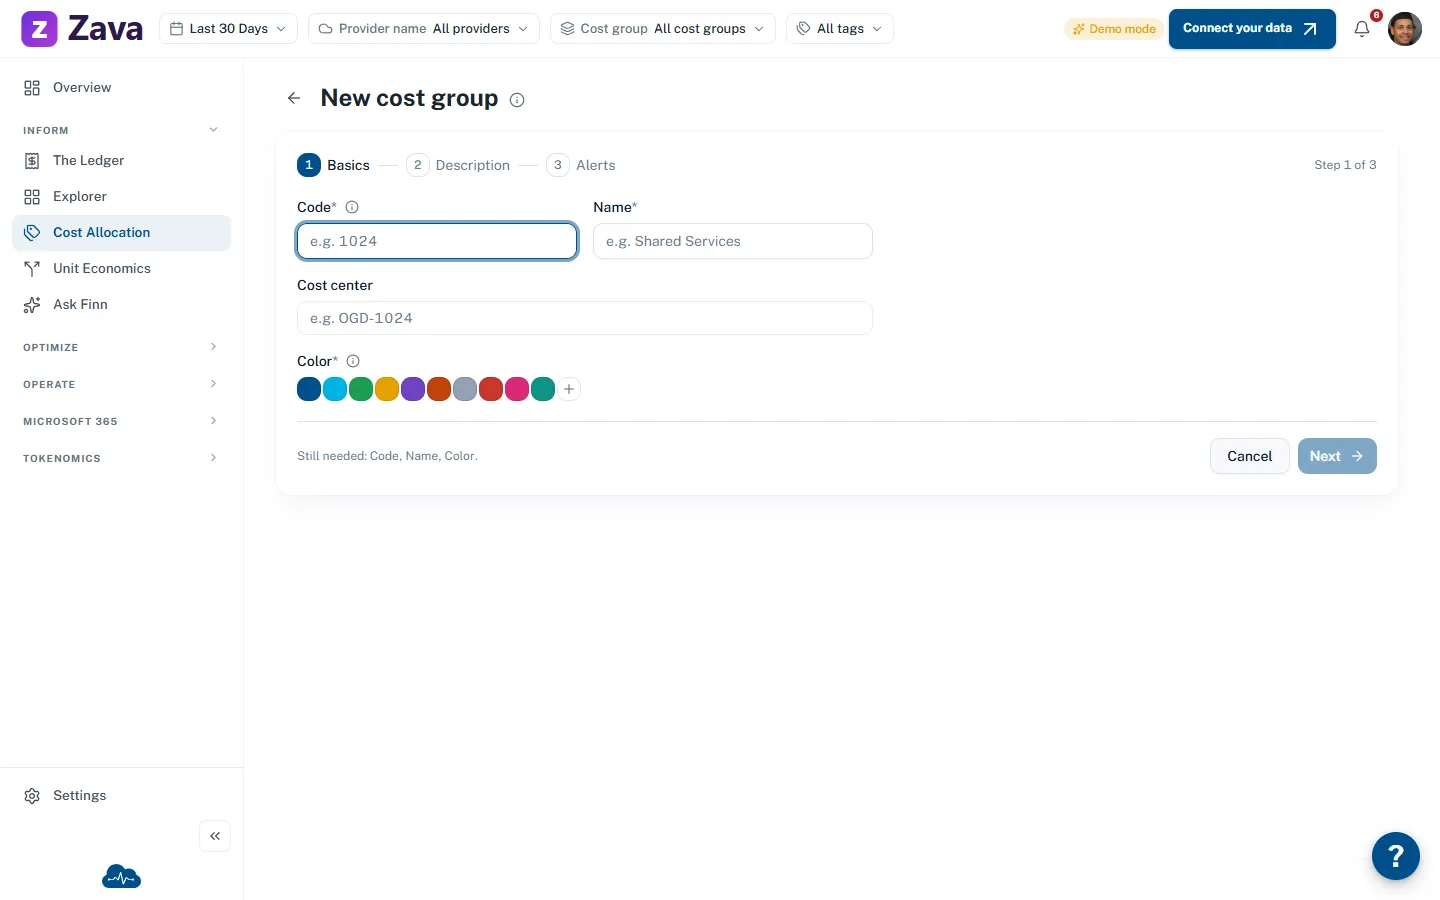
Step 2: Basics
Section titled “Step 2: Basics”Only the cost center is optional here, and only Code is expensive to change later: allocation rules match on it.
Code: up to 20 characters, yours to define. It does two jobs: matching an identifier from
another system, and routing spend by naming convention. If a reservation or resource name contains
the code wrapped in underscores (_1024_), an allocation rule can send it straight to this group
with no retagging. Worth choosing deliberately rather than accepting a number.
Name: up to 40 characters, e.g. Shared Services. This is what everyone sees.
Cost center: optional, up to 40 characters, e.g. OGD-1024. Set it if you want groups to roll
up the way your accounting system does. You can pick an existing one or type a new one.
Color: pick a preset or choose your own. It becomes this group’s dot everywhere in the app, so make related groups visually distinct rather than choosing at random.
Step 3: Description
Section titled “Step 3: Description”Required, up to 500 characters. Write what the group represents, not what it’s called: the name already says that. Six months on, this is what tells someone whether a charge belongs here.
Step 4: Alerts
Section titled “Step 4: Alerts”Choose where this group’s Teams alerts should be delivered. Keep the organization channel selected to use the workspace destination, or clear it to enter a dedicated HTTPS webhook for this group. Give the group its own Slack webhook or email recipients afterwards, from the Alerts step of the Cost Group editor. The editor shows each channel only while an administrator has turned it on in Settings ▸ Alerts, and a group’s own destination replaces the organization one on that channel only. See How to set Teams, Slack and email alerts.
Select Set up a budget after creating this cost group if you want CloudMonitor to open the budget form with the new group already selected after creation.
Step 5: Create
Section titled “Step 5: Create”Create cost group commits it. What you get is an empty container with your name on it as Owner: it can be budgeted and reported on immediately, but no money is in it until an allocation rule sends some. Plan for that gap before you promise anyone a chargeback number.
What happens next
Section titled “What happens next”You become the group’s Owner automatically. There’s no owner field on the form: whoever creates a group gets the Owner role on it, and you add others afterwards from Manage team.
No spend is in it yet. Creating a group doesn’t move any money into it. What lands in a group is decided by allocation rules, which is a separate step people routinely forget.
Reports stay empty until the next update. The group appears in the top-bar filter straight away, marked Pending. Its reports fill in once CloudMonitor next recalculates which costs belong where. That’s expected. Nothing is broken.
Editing one later
Section titled “Editing one later”Open the group from the list and choose edit. The editor separates the existing values into Basics, Description, and Alerts. You can choose any section directly or use Back and Next; navigation never saves a partial section. Save changes appears on Alerts and writes the whole edit together. Cancel restores the last saved values in place, and CloudMonitor warns before you leave with unsaved changes.
What you can’t change there: who’s on the team (that’s Manage team) and what spend lands in it (that’s allocation rules). Both are deliberate: each thing has one editing surface, so the settings stay in agreement.
Archiving
Section titled “Archiving”Archive from the row’s ⋮ menu. It moves to the Archived tab and can be restored any time.
Be aware of the knock-on: any allocation rule pointing at an archived group becomes Invalid and stops applying, so its spend falls through to whatever matches next, usually the Unallocated catch-all. Repoint or delete those rules rather than leaving them.
The built-in Unallocated group can’t be archived or deleted at all. Every charge has to land somewhere.